Five-phase EMR migration checklist for clinics: planning, data cleaning, secure ETL, testing, go-live support, and automation to minimize errors and downtime.
Switching to a new EMR system can improve clinic operations, but it’s a complex process that requires careful planning. Without proper preparation, errors like duplicate records or missing data can lead to inefficiencies and risks to patient safety. Here’s a quick summary of the five key phases for a successful migration:
Key stats: 70% of IT projects fail due to poor planning, and duplicate patient records affect up to 60% of merged systems. A structured approach ensures smooth transitions and improved patient care.
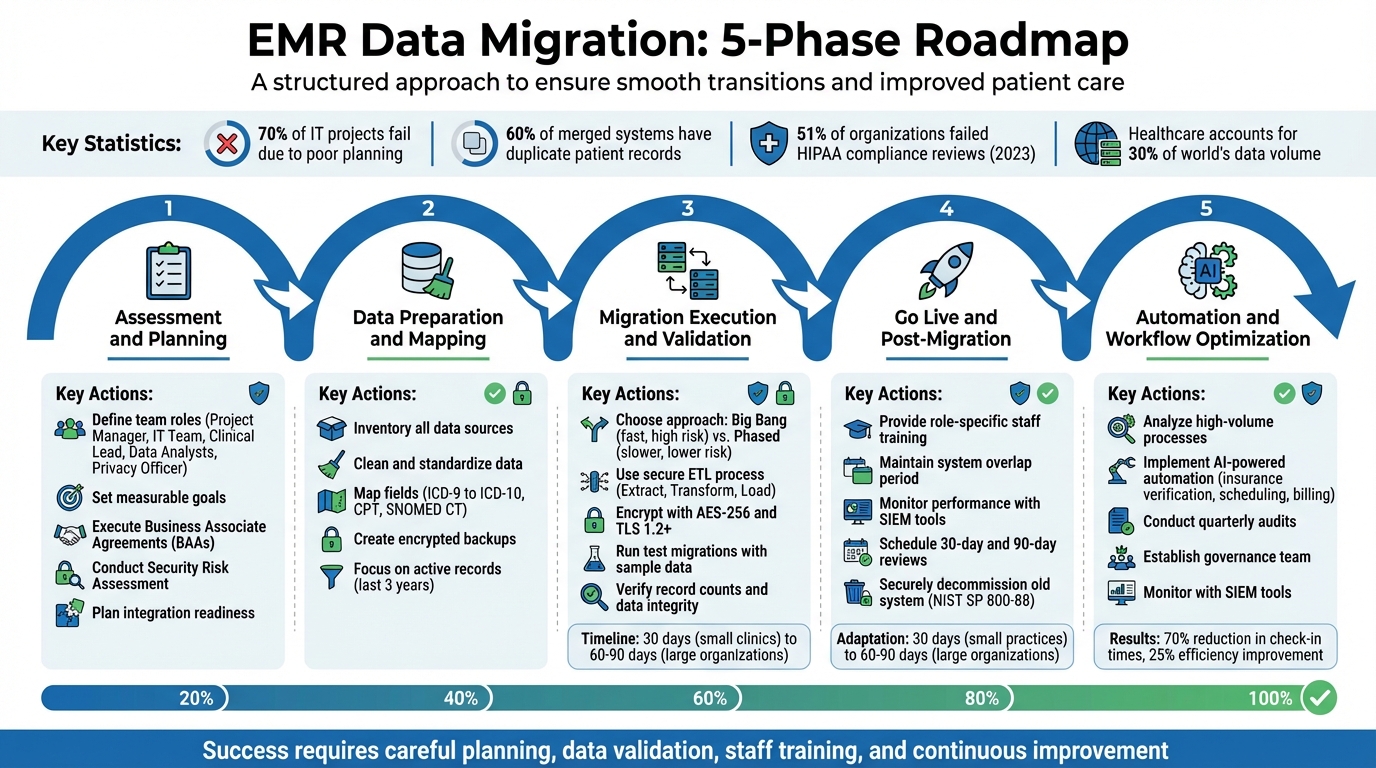
5 Phase EMR Data Migration Process for Healthcare Clinics
Before diving into patient data migration, it’s essential to lay a strong groundwork. This phase sets the stage by defining responsibilities, outlining data flows, and ensuring compliance measures are in place.
Start by assigning specific roles to your team members:
Andrew Marsh, IT Leader at Platform 3 Solutions, emphasizes the importance of EHR systems:
"EHR systems are not just record keeping systems. They are the memory of your clinical, operational, and compliance decisions".
To keep responsibilities clear, consider using a RACI matrix. This tool helps outline who is responsible, accountable, consulted, and informed at every step, reducing confusion when quick decisions are needed.
Identify all types of data involved - patient demographics, medications, allergies, lab results, immunizations, and appointment schedules. It’s important to distinguish between "active" data required for immediate care and historical records that can be archived. This decision impacts both system performance and security.
Set clear, measurable goals before starting. Success might look like:
For example, spot-checking critical data like allergies and medications should show no errors. Additionally, define acceptable error rates and downtime limits upfront to establish clear go/no-go criteria.
Ensure compliance with HIPAA regulations by executing Business Associate Agreements (BAAs) with all vendors or cloud providers handling Protected Health Information (PHI). Appoint a Privacy Officer and a Security Officer to oversee compliance efforts.
Conduct a formal Security Risk Assessment to uncover vulnerabilities in how electronic PHI is stored and transmitted during the migration. Alarmingly, 51% of organizations failed HIPAA compliance reviews in the year ending May 2023, leading to corrective action plans. To stay compliant:
Evaluate your current infrastructure to ensure it can handle the demands of the new system. Create a list of all external integrations, such as labs, pharmacies, imaging systems, and Health Information Exchanges (HIEs).
Plan the transition carefully, scheduling cutover windows - like a Saturday afternoon - to minimize disruptions. To reduce risks, run both the old and new EMR systems concurrently for a period. This overlap acts as a safety net in case issues arise. Finally, test all interface connections before the official go-live date and have your IT team ready to troubleshoot in real time.
Once the planning phase is complete, it’s time to prepare your data for migration. Did you know the healthcare industry accounts for about 30% of the world’s data volume? Clinics often find themselves dealing with years of patient records riddled with duplicates, outdated codes, and inconsistent formatting. As Mustafa Raja, Data Technical Lead at The HCI Group, aptly states:
"Junk in is junk out... it is vital that your organization take the time to look at exactly what they are migrating, why they are migrating it, and how they can be consistent with the data they put in to their new system."
Start by identifying every system that stores patient data - your primary EHR, radiology systems like RIS and PACS, third-party billing platforms, and lab interfaces. Separate your data into two categories: structured data (lab results, medication codes) and unstructured data (notes, scans). Each requires a tailored approach during migration.
Focus on active patient records - typically those from the last three years - and archive older or inactive records. This approach reduces the complexity of migration and keeps your new system running efficiently. As you review, flag common issues like duplicate files, missing Social Security numbers, incomplete dates of birth, or mismatched coding standards (e.g., ICD-9 versus ICD-10). These errors must be resolved before transferring the data.
Clean up your data by eliminating duplicates and standardizing entries in your current system. This ensures you’re not importing messy or inconsistent records into the new EMR. Update all clinical codes to align with current standards, such as ICD-10 for diagnoses, CPT for procedures, and SNOMED CT for clinical terminology.
Standardize formatting across the board. For instance:
Before migration, close any open documents and consolidate duplicate accounts to avoid confusion in the new system.
Create a detailed mapping table that links each field in your old EMR to its equivalent in the new system. Pay special attention to required fields in the new EMR that might have been optional or nonexistent in the legacy system. Decide how to handle gaps - whether to fill them with existing data, leave them blank (if allowed), or plan for manual entry.
| Data Type | Mapping Consideration | Transformation Rule Example |
|---|---|---|
| Demographics | Required fields (SSN, Phone) | Standardize phone formats (XXX-XXX-XXXX) |
| Clinical Codes | ICD-9 to ICD-10 transition | Map legacy codes to current billing standards |
| Medications | Active vs. Historical | Only migrate "active" meds to the current list |
| Lab Results | Discrete vs. Image | Convert text-based results into discrete data points |
| Dates/Times | Format consistency | Convert all legacy dates to MM/DD/YYYY |
For free-text notes and scanned documents, establish clear rules. Will they transfer as searchable text blocks or remain as PDF attachments? Document these mapping rules thoroughly to minimize errors during execution.
Before making any changes, create a complete encrypted backup of your current system and store it securely, away from your primary servers. Document a step-by-step plan to restore the old system in case issues arise during migration.
Run a test restoration before the go-live date to ensure your backups are complete and functional. This safety measure is crucial - if something goes wrong during the migration or the new system encounters issues, you’ll need a reliable way to revert to the original setup without losing patient data or disrupting care. With this safety net in place, you’ll be ready to move forward with migration execution and validation.
With your data cleaned up and properly mapped, it’s time to start the transfer. This step follows the Extract, Transform, and Load (ETL) process. Data is first pulled from your source system, then transformed to fit the format of the new EMR - often using standards like FHIR or HL7 - and finally loaded into the target database. At every stage, security testing should be a top priority.
There are two main strategies for migration: big bang and phased.
For smaller practices, migrations can often be completed in about 30 days. Larger organizations or multi-site networks may need 60 to 90 days or more. Plan your final cutover during times of low activity - late Friday evenings or holiday weekends are ideal - to minimize disruptions to patient care.
| Migration Approach | Execution | Speed | Risk Level | Best For |
|---|---|---|---|---|
| Big Bang | All data and users switch at once | Fast; single-step transition | High; any failure impacts the entire clinic | Small clinics with limited data |
| Phased | Gradual rollout by department or location | Slower; multi-step process | Lower; risks spread out | Large hospitals or multi-site networks |
Choose migration tools that can handle your data volume and meet your system’s needs. Popular options include Talend, AWS DMS, and Microsoft SSIS. Security should be built into every step of the process.
Before migrating the full dataset, conduct trial runs with sample data. These "mock go-lives" are essential for spotting bottlenecks, mapping errors, or system failures without risking sensitive patient information. During these tests, use data masking to replace real patient health information (PHI) with synthetic data, ensuring privacy.
Clinicians should be involved in the process. Assign "super users" to lead User Acceptance Testing (UAT). These staff members should test everyday workflows - retrieving patient histories, adding progress notes, ordering labs - to confirm that the migrated data works seamlessly in real-world scenarios. As True North ITG emphasizes:
"EHR data migrations will require a great deal of data validation and testing, and new workflow documents will have to be created too."
Address any issues identified during UAT before moving forward with the full migration.
Once the migration is complete, verifying the integrity of your data is critical. Start with a basic record count comparison. For example, if your legacy system had 10,000 patient records, the new system should reflect the same number. Use checksums to detect file corruption and run automated scripts to compare column totals and summary values between the old and new systems.
Manually review high-risk data, such as allergies, medications, lab results, and visit histories. Focus on active patients from the last three years, as this information is crucial for ongoing care.
Anand K from LeadSquared highlights the stakes:
"Any missed detail is not just a mistake, as it can affect patient safety and disrupt day-to-day operations."
Always keep a rollback plan ready. If critical errors or data corruption are found, you should be able to revert to the legacy system without losing patient information. Only after thorough validation and a 30-to-90-day review period should you consider decommissioning the old system.
Once your migration validation is complete, it's time to prepare for the live switch-over. This phase is crucial - it can make or break your migration. The first few weeks are especially important as staff adapt, systems are monitored, and workflows are fine-tuned to meet real-world demands.
Before going live, ensure all stakeholders have signed off on key items like data verification, backup readiness, and a functional rollback plan. Having a rollback plan ready to go is essential for minimizing risks during this critical phase.
Plan for downtime by documenting workflows for essential tasks like patient check-ins, prescription refills, and lab orders. To ensure a smooth transition, maintain a safe overlap period where both the old and new systems are accessible before fully retiring the legacy EMR. These steps help create a solid foundation for staff training and system oversight once the new system is live.
Provide concise, role-specific training sessions to get your team up to speed. For example, front desk staff should focus on scheduling and patient intake, while billing teams should concentrate on claims submission and accounts receivable processes. Ram Krishnan, CEO of Valant, advises:
"Learning a new system doesn't happen all at once, so it is best to prioritize the most critical functions".
Appoint super users to lead specific workflows and offer guidance to their colleagues. Use a variety of training formats - like hands-on sessions and video tutorials - to cater to different learning preferences. During the first few weeks, ensure on-call technical support is available so staff can quickly resolve any issues they encounter. Smaller practices often adapt within 30 days, while larger organizations may need 60 to 90 days to fully adjust. This structured approach helps ease the transition and builds confidence in the new system.
After the system goes live, ongoing performance monitoring is key. Start by verifying record counts and reviewing a sample of high-risk patient charts - such as those with allergies, medications, or lab results - to confirm data accuracy. Use Security Information and Event Management (SIEM) tools to detect unauthorized access or suspicious activity.
Schedule formal reviews at 30 days and 90 days post-migration. The 30-day review should address immediate technical issues and staff concerns, while the 90-day review provides an opportunity to refine workflows, improve system performance, and identify areas where additional training might be needed. Monitor productivity trends closely - are appointment scheduling times increasing? Are clinicians spending extra time on documentation? Use these insights to adjust workflows or schedules as needed. Once the system is stable, decommission the old one securely, following NIST SP 800-88 standards for data destruction.
With your new EMR system fully operational, it's time to take efficiency to the next level by introducing automation. This phase focuses on turning your system into more than just a record-keeping tool - it becomes a smart engine that handles repetitive tasks, saving time and reducing manual effort. Here's how to analyze workflows, integrate AI-driven automation using MedOps, and maintain continuous oversight to ensure everything runs smoothly.
Start by conducting a post-migration audit to identify high-volume processes that can benefit from automation. Tasks like insurance eligibility verification, patient scheduling, and billing cycles are prime candidates. These areas not only involve repetitive work but also contribute significantly to clinician workload, making them ideal for streamlining. Automation here builds on the data quality improvements achieved in earlier phases, enhancing overall efficiency.
To ensure you're targeting the right areas, use monitoring tools to track usage patterns and pinpoint any bottlenecks in your workflows. For example, look for challenges with new interfaces or tasks requiring multiple windows. Update your workflow maps to reflect these changes, ensuring they align with standards such as FHIR or HL7. This ensures your processes remain efficient and compliant with clinical guidelines.
MedOps is an AI-driven platform specifically designed for healthcare automation. It simplifies complex tasks like insurance eligibility verification by eliminating the need for staff to manually navigate multiple portals. Through intelligent triggers, MedOps reduces data entry errors and speeds up processes like prior authorizations. It seamlessly integrates with your EMR and billing systems to create a unified, efficient workflow.
The benefits of AI automation are clear. For instance, MedOps has been shown to cut patient check-in times by 70% and improve overall efficiency by 25%. By automating these tasks, your team can focus more on patient care and less on administrative burdens.
Automation isn't a "set it and forget it" solution - it requires ongoing oversight to ensure it continues to deliver results. Establish a governance team to monitor automated processes and maintain data quality. As Archon aptly puts it:
"Governance begins the moment you migrate".
Schedule quarterly audits to measure performance against key metrics, such as error rates in automated insurance verification or time saved in scheduling. Regular reviews help identify areas for further improvement. Monthly feedback sessions with staff can also uncover practical insights and ensure the system is meeting their needs.
For security, use tools like Security Information and Event Management (SIEM) to monitor automated data transfers in real-time. These tools can quickly detect unauthorized access or system failures, helping you stay compliant with regulations like HIPAA and HITECH. By keeping a close eye on your automated workflows, you can adapt to the evolving needs of your clinic while maintaining high standards of security and efficiency.
Migrating to a new EMR system involves navigating through five key phases: assessment, data preparation, execution, go-live, and optimization. Together, these steps ensure a smooth transition and set the stage for improved operations in the long run.
A National Physician Poll conducted by Stanford highlighted widespread dissatisfaction among providers with their current EHR systems. This underscores the importance of thorough data cleaning, validation, and staff training during the migration process. After the migration, ongoing performance reviews, audits, and staff input help ensure the system evolves to meet practical, day-to-day needs. As noted by MedicalRecords.com:
"Successful migration to a new or upgraded EMR system will depend on careful and individualized analysis and planning, which will need to be re-visited and updated as implementation progresses".
Regular refinements can transform a basic system into one that truly meets the demands of your practice. Automation plays a critical role in this evolution. Tools powered by AI, like those offered by MedOps, can take over time-consuming administrative tasks such as insurance eligibility checks, patient scheduling, and billing. This allows your team to dedicate more energy to patient care.
Clinics face three primary hurdles when migrating EMR data, each with its own set of complications. The first is data accuracy and completeness. Missing or incorrect details - like patient demographics, medication histories, or allergy information - can lead to errors, slowdowns, and a loss of confidence in the system. Next, workflow disruptions often arise. Staff may need extra time to adapt to the new system, which can limit appointment availability and negatively impact revenue. Finally, technical and compliance issues - including data mapping, validation, and adherence to HIPAA standards - can lead to delays and increase the risk of data loss.
These obstacles can leave clinics with incomplete records, extended downtimes, and heightened regulatory challenges. To minimize these risks, clinics should prioritize thorough data cleansing, conduct rigorous testing, and implement clear governance strategies for a smoother migration process.
To maintain HIPAA compliance during an EMR migration, clinics should begin with a detailed risk assessment. This step helps pinpoint vulnerabilities and ensures the right safeguards are in place to protect Protected Health Information (PHI). It’s also crucial to review and update privacy and security policies to reflect the migration process. Make sure all staff members are fully aware of their roles in safeguarding data confidentiality. Additionally, clinics must have a Business Associate Agreement (BAA) in place with the EMR vendor and confirm the vendor’s compliance with HIPAA regulations before any data transfer occurs.
Protecting PHI during migration requires robust security measures. Use encryption for data both at rest and in transit, implement secure transfer protocols like SFTP or VPN, and enforce strict access controls. Before diving into the full migration, conduct a pre-migration test using sample data to verify both accuracy and security. Document each step of the process carefully to establish an audit trail. Once the migration is complete, perform a comprehensive audit to ensure data integrity and confirm there was no unauthorized access. Regular internal HIPAA audits after the migration will help identify and address any compliance gaps introduced by the new system.
After switching to a new EMR system, clinics need to take a few important steps to ensure smooth operations. Start by thoroughly reviewing patient records, schedules, and billing data to confirm everything transferred accurately during the migration. This step is crucial for catching any errors or mismatched fields early on.
Next, focus on training your staff with materials tailored to their specific roles. Combine hands-on practice with role-based tutorials so everyone feels confident navigating the system. Make sure to cover system shortcuts and custom features, such as templates and digital forms, that can save time. Adjust the EMR settings to fit your clinic’s workflows - this might include automating appointment reminders, enabling telehealth options, or simplifying payment processes.
Lastly, set up a plan for ongoing improvements. Use the system’s analytics tools to track metrics like check-in times or claim rejection rates, and schedule regular meetings with your team and vendor to tackle issues, roll out updates, and stay compliant with regulations. By following these steps, your clinic can get the most out of the new EMR system while improving efficiency and patient care.